Plan Ahead: 12 Calendars + Planners for 2016

As 2015 comes to a close (what?!), I start thinking about the new year and all the plans I have to fill it.  I am semi-obsessed with planners and calendars.  I prefer to write down my appointments and make lists with a pen and paper, so I love searching for new planners every year.  I’ve rounded up 12 of my favorite calendars and planners to help you start the new year off with a bang!

Calendar 1

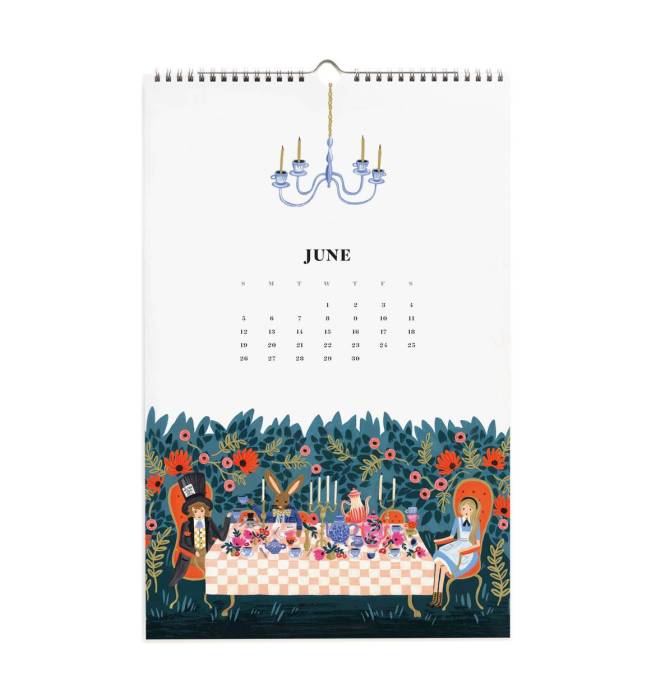
  1. Rifle Paper Co. – Alice in Wonderland – Fall in love with this classic story every month with this beautifully illustrated wall calendar by Rifle Paper Co.  The tea party scene is one of my favorites!Calendar 2
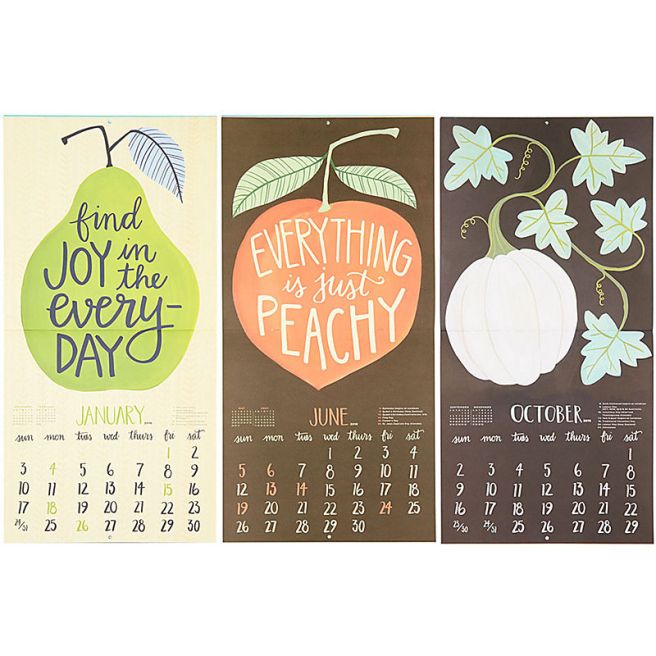
  2. 1 canoe 2 – 2016 XL Wall Calendar  – There is definitely something to be said for the handpainted homegrown goodness of this 1canoe2 calendar.  If you’re a gardener or know someone who is, this is the perfect choice. Calendar 3
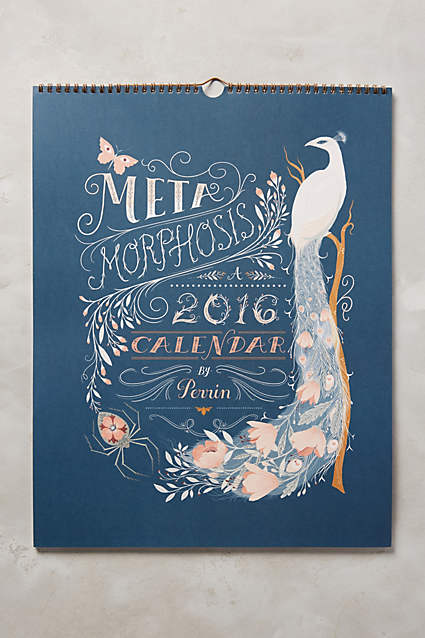
  3. Lisa Perrin – Metamorphosis – Gorgeous depictions of wildlife might just inspire you to undergo a metamorphosis of your own in 2016.Calendar 4
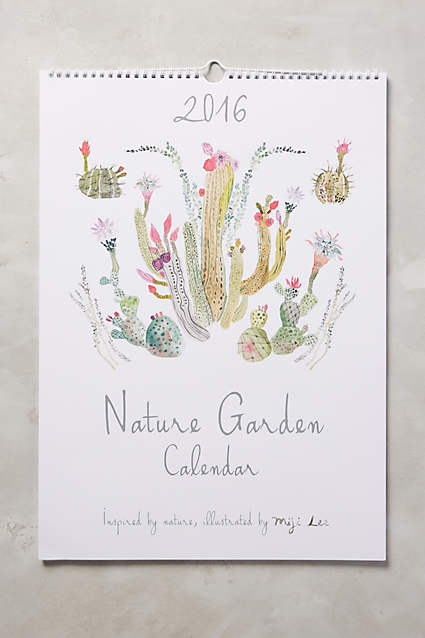
  4. Miji Lee – Nature Garden – The watercolors in this calendar are absolutely beautiful in their simplicity.  If nature inspires you as much as it did Miji Lee, this calendar is for you!Calendar 5
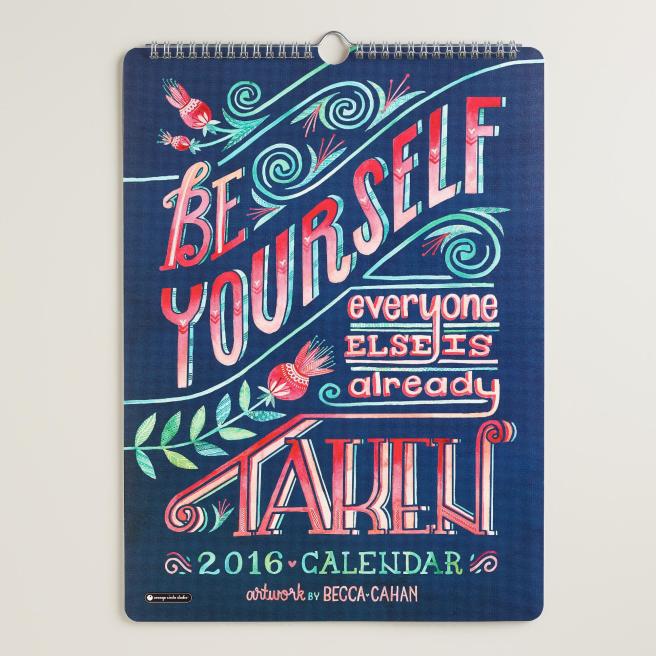
  5. Becca Cahan – Be Yourself – This is a calendar I would have displayed in my classroom.  It is such a good reminder to love yourself and be happy with who you are.Calendar 6
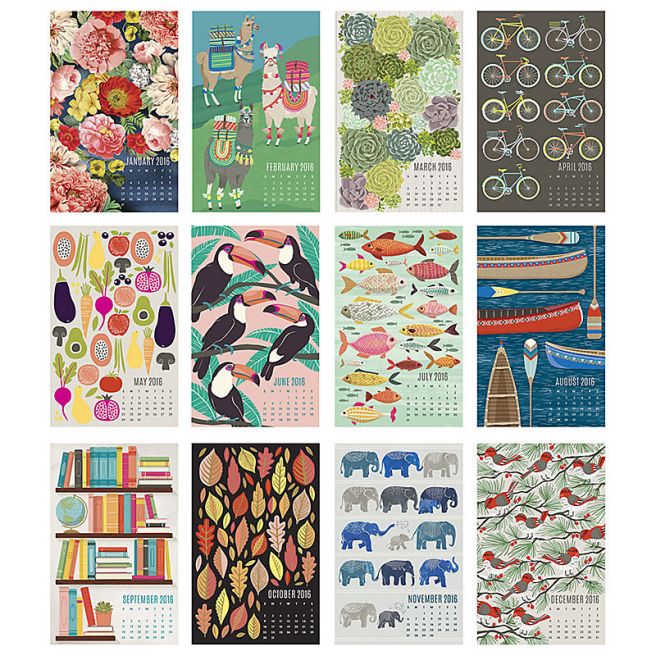
  6. Paper Source Wall Art Calendar (20% off code: FALALA) – February is my favorite month in this calendar.  Who doesn’t love a good picture of some llamas?!  And at 20% off?  Yes, please!Calendar 7
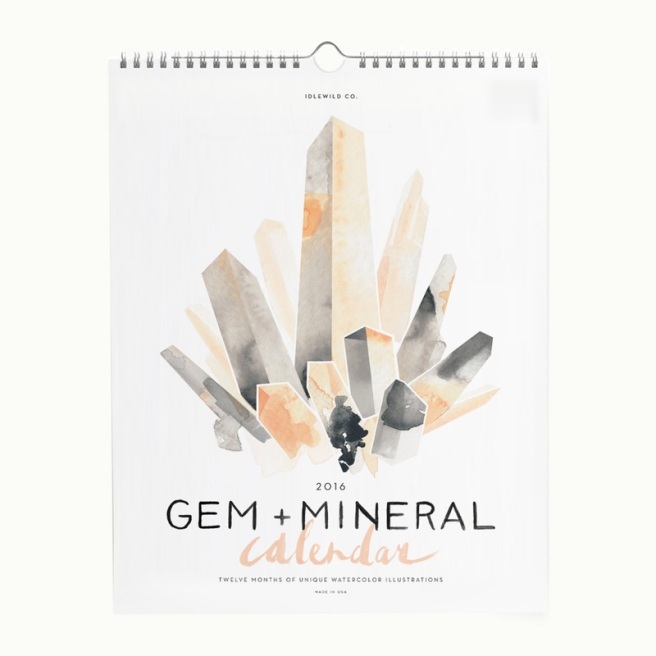
  7. Idlewild Co. – Gem & Mineral Wall Calendar – Another gorgeous watercolor collection.  There really isn’t much more beautiful than the natural world, and the artist captures this segment very well.Calendar 8
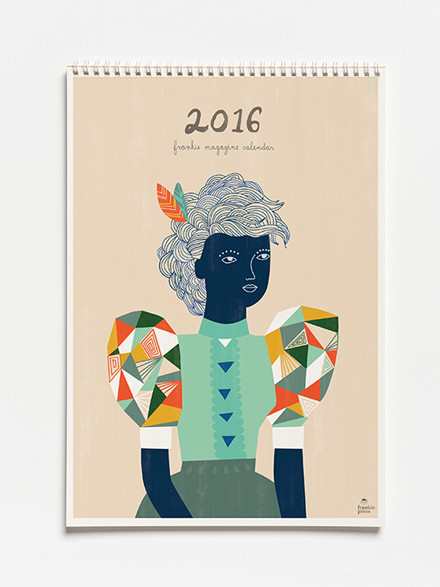
  8. London Fields – Frankie Wall Calendar – Normally I am not a huge fan of modern art, but something about this calendar sparked my interest.  Each month definitely gives you an image to ponder over.Calendar 11
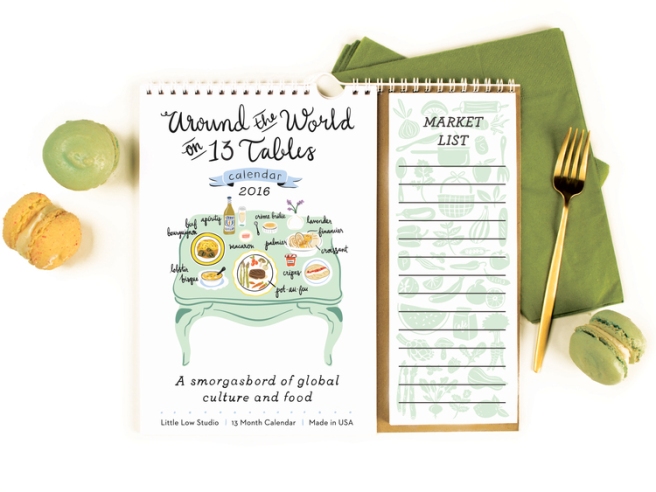
  9. Little Low Studio – Around the World on 13 Tables – A great calendar for the foodie in your life.  I love that it has a market list available to write down all the goodies you want to try after looking at the table spread each month.Calendar 9
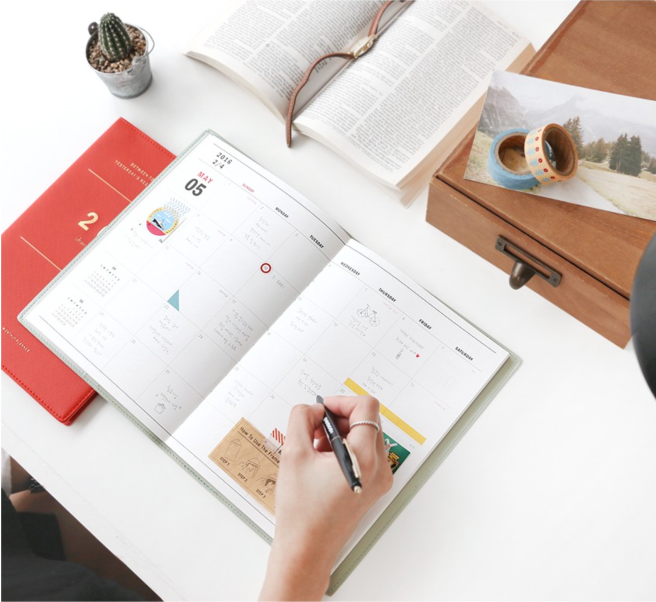
  10. MochiThings – 2016 The Planner L – This year, I am focusing on simplicity in my planners, and I can’t get enough of this planner.  It contains monthly calendars as shown plus grid pages and more!  The simple design allows you to really show your own personality in the pages.Calendar 10
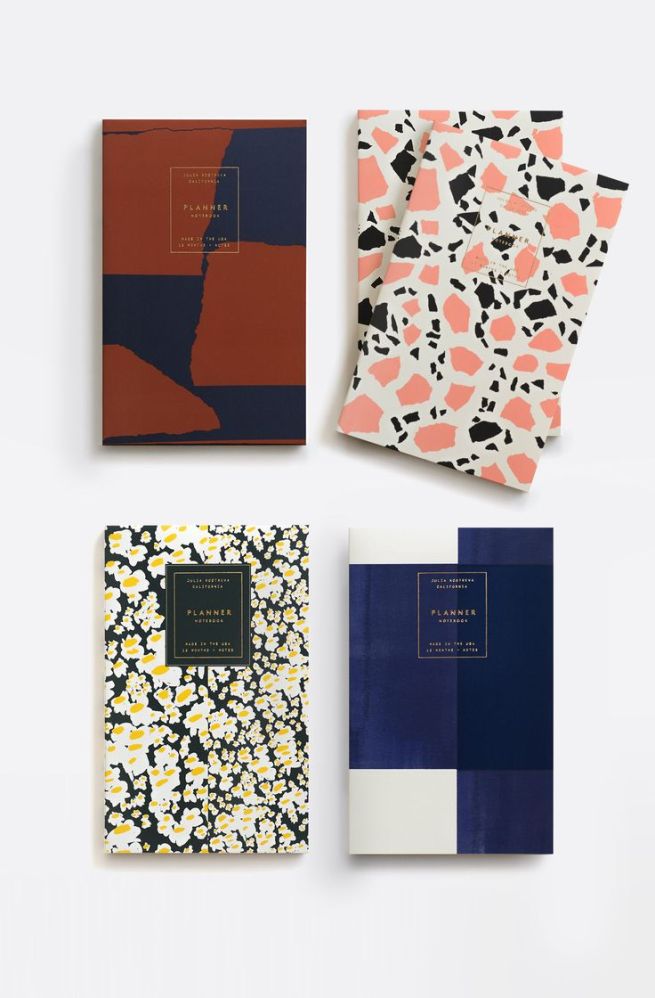
  11. Julia Kostreva – Daily Planners – Simple inside and classic with a twist covers.  There really isn’t anything else to say.  Check yes!  Calendar 12
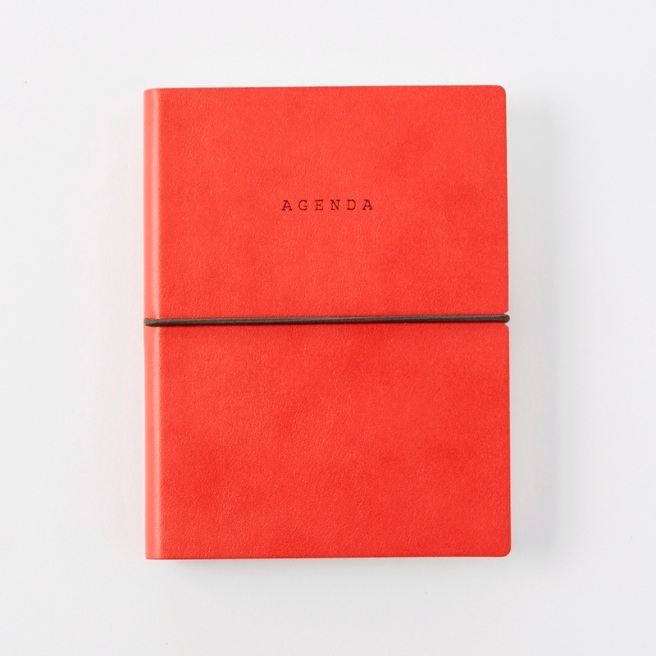
  12. Poketo – Medium Agenda Planner – Another gorgeously understated planner perfect for filling with all your hopes and dreams for the year.

So…now that you have all this great artwork from your wall calendars, what do you do with it once the month has passed?  Easy.  Frame it.

Calendar Display Art
via Brit + Co

10 Gorgeous Holiday Tablescapes

You already know how much I love the holidays, so I might as well share with you all the beautiful tablescapes that are inspiring me this year.  Here are 10 gorgeous and totally doable tablescapes to try on your own table.

Holiday Table 1
via Apartment Therapy

1. Bountiful Harvest: Gather up a beautiful selection of produce to grace your table this season.  Compliment the vivid colors with a simple linen table runner.  And the best part?  You can eat it!  No need to figure out storage options.

Holiday Table 2
via Brit + Co

2. Interactive Kids Table: The kiddos need a fun place to gather, too!  I love this interactive table that invites kids to write, draw, and make the table their own.

Holiday Table 3
via Ruffledblog

3. Rustic Meets Gilded: Can’t decide between a rustic Christmas scene or a glitz-filled wonder?  Combine the best of both worlds with the rustic table runner of evergreens, pinecones, and antlers against the gilded chargers and flatware.  Add a little shine on your runner with glittered candle holders.

Holiday Table 4
via Style Estate

4. French Simplicity: I absolutely love the table runner in this look.  The french linen is the perfect base to start with.  It compliments the simple dinnerware and easy centerpiece.  The string lights add just the right amount of ambiance that lets your guests sink into the holiday spirit with ease.

Holiday Table 5
via Brit + Co

5. Cinnamon Touches: Who knew a cinnamon stick could be the perfect addition to your holiday table?  Forget fancy napkin folds and grab twine and cinnamon sticks for a simple and aromatic touch to your dinnerware.

Holiday Table 6
via Anthropologie

6. Food Focus: Forget laboring for hours to find the perfect oversized ornaments and glitzy trees for your table and make the food the focus of your gathering instead.  Choose an interesting yet subtle table runner and scatter a few small vases of fresh flowers here and there.

Holiday Table 7
via Våra Oköttsliga Lustar

7. Christmas Carols: Gear up for a little DIY and print off some Christmas carols to use as your placemats.  I also love that the dinner plate is the focus of this setting.  If you have decorative china, Christmas is the perfect time to show it off!

Holiday Table 8
via vtwonen

8. Look Up for Luster: Completely switch up the line of sight for your guests and bring the interest up overhead.  If possible, hanging a simple bar or log from your ceiling to decorate with ornaments and lights would be ideal, but this option works well, too!

Holiday Table 9
via Midwest Living

9. Paper Trees: Grab a book of holiday scrapbook paper and make a row of paper trees to decorate your table with.  This would be an easy project the kids can help with.

Holiday Table 10
via EthanOllie

10. Snow Globe Wonderland: Whip up some DIY snow globes with mason jars and toy animals or pine trees.  Create some dimension by stacking the globes on each other or rustic tree rounds.


Holiday Party DIYs: Jingle Bell Shaker + Mocktail Recipes

IMG_4017When planning a holiday party, drinks are a must.  Often the drinks don’t get the attention they deserve because it is so easy to go to the store and buy soda or tea or whatever, especially if you choose not to serve alcohol at your party.  This project is all about adding a little Christmas-y fun to drink making so that you’ll take the extra time to make drinks for your guests that everyone will enjoy.

For starters, you need the right tools to make beverages just like you do when cooking food.  A cocktail shaker is a good tool even for nonalcoholic drinks.  I was inspired by a gorgeous bell-encrusted shaker I saw on Anthropologie (of course…), but I didn’t necessarily want to spend that much money on one.  Solution: I made it myself.

IMG_4005

Supplies:

  1. Cocktail shaker – I found one at TJMaxx for $7
  2. Bells – Dollar Tree.  The coolest part is that the bells don’t make an annoying noise.  Just a light nice sound commemorative of sleigh bells.  Ahh….
  3. Glue – I used the E6000 permanent bond variety.  I would recommend buying a larger tube than the one in the picture.

What to do:

  1. Take off the jigger (top piece) and set it on a surface you don’t mind getting a little glue on.  You can also put a paper towel or something down to protect your surfaces.IMG_4008
  2. Just start gluing the little bells on.  The only tip I know to give you is not to skimp on the glue.  If you do, they will keep falling off as you add on your bells, and it’s really annoying.  Trust me.
  3. Continue gluing on bells until the outside surface of the jigger is covered and let dry.
  4. Mix up a fun beverage and enjoy the sweet bell sounds!

Need some drink inspiration?  Check out these recipes and choose the perfect one (or four?) for your party.

IMG_4014

Holiday Party DIYs: Dessert Plates

IMG_3987Yes, I am one of those people…  The kind of person that doesn’t mind that Christmas items are put out in stores before Halloween.  That being said, I don’t let myself decorate for Christmas until after Thanksgiving and only allow myself one or two listens to a few of my favorite Christmas songs.  I’ve already warned my husband the second the plane touches down after we visit his folks for turkey day, it is game on.  The decorating begins.

However, I find it completely justifiable to create holiday-related projects at any time of year, though.  I mean, it’s just good planning.  So, yes…I have started my Christmas DIY projects before Thanksgiving, and I definitely won’t judge if you join in.

This year, I centered my projects around items for a holiday party.  I have a new house and both my husband and I like having people over for dinner, games, etc.  I sort of believe that a party isn’t a party without dessert of some kind, so I decided on making really cute dessert plates.

Supplies:

  1. White dessert plates – I found mine at the dollar store
  2. Metallic multi-surface acrylic paint – I used Hand Made Modern 20K Gold acrylic paint from Target.  They even have rose gold if you’re following that gorgeous trend.  It is important that you find paint that will work on the plates you chose and follow the instructions provided to you with the paint.  This paint explains that it IS top-shelf dishwasher safe, which is super important.  you don’t want all your hard work to wash off after the first use.
  3. A brush of some kind – I used a small brush I had on hand, but sponge brushes are great for craft projects and you don’t have to worry about leaving behind stray brush hairs…
  4. Tape
  5. Exacto knife (optional)

What to do:

  1. Wash the plates and then clean the surface with rubbing alcohol.  This allows for a better surface for the paint to adhere to.
  2. Decide on your pattern.  I opted for a very simple stripe design because that is what I like.  Make your pattern reflect who you are.  That will make the time spent on your project more enjoyable.  A crazy geometric pattern could be fun too!Dessert Plates 1
  3. Tape off your pattern on the plate.  I cut my tape in order to make different size stripes.  Make sure the tape is completely stuck down.  You don’t want paint getting under it and messing up your design.
  4. Give your plate one coat of paint and wait for it to dry at least an hour before you apply another coat.  Coat as many times as you think necessary.Dessert Plate 2
  5. Remove the tape once the paint is completely dry.  Allow your paint to dry for at least 21 days (curing process) before use.  There is a bake-to-cure method for those who just can’t wait, but you must make sure your paint can withstand the process.  It is best that you start the project early and let it air dry.
  6. Enjoy!IMG_3986

When Tea Towels Double as Art…

Tea Towel

…you do an embarrassing happy dance in the middle of your kitchen!  I went to the grand opening of the Magnolia Market Silos (#silobration) this last weekend in my hometown of Waco, TX and picked up a few things to spruce up my home.  I bought the cookbook stand with it’s nifty little weights and the tea towel.  I love the idea of tea towels doubling as art pieces, and this one happens to be super functional, too!  I chose not to frame mine, but they look great in a simple frame.  Check out this tutorial from HGTV on making your own tea towel art.  OR…get really crafty and make your own tea towels

Framed Tea Towels

Book Recommendation: Simply Retro with Camille Roskelley

IMG_3884If you love giving vintage looks a modern twist and you like to quilt, then you’re going to love Simply Retro with Camille Roskelley: Fresh Quilts from Classic Books.  Quilting has never been my thing, but since I no longer teach fashion design and I work for a company called Stitch Fix, I don’t sew clothing as much as I used to.  I thought I would pick up quilting, and I am loving the patterns in this book.  Complete with easy-to-read instructions and colorful guides, this book makes quilting very exciting.  In keeping with my husband’s “go big or go home” motto, I started with a king size quilt called “Fresh.”  Can’t wait to share my finished product!

IMG_3889
“Fresh” Quilt Pattern
IMG_3885
I love this classic pinwheel design

Looking for fun fabric?  Here are a few of my favorite designers:

Sweet-as-Honey-by-Bonnie-Christine-500x500Bonnie Christine

Elizabeth Olwen Fabric

Elizabeth Olwen

Rosemary Milner Fabric

Rosemary Milner

Cheers! -Josie

Skillshare: A Mecca for Compulsive Learners

I am a compulsive learner.  I think many teachers have this problem, and I am definitely no exception.  Enter Skillshare: an online forum for hundreds of creative classes taught by exceptional people who want to share their particular skill with the world.  The site has classes in a variety of categories including design, photography, writing, crafts, gaming, music, and more!  My husband found a class to further his skills using Pro Tools, a music mixing program.  I stumbled upon a surface pattern design class and fell in love.  I already have a love for design, and this class is teaching me a new creative outlet by taking my designs and making them digital using Adobe Illustrator.

Skillshare Class

The class I have been taking, Intro to Surface Pattern Design: Learn Adobe Illustrator, is taught by Bonnie Christine, author of the creative blog Going Home to Roost.  I love how she breaks down every step of her creative process for you and thoroughly explains her use of Illustrator.  I’m so excited to learn more about the surface pattern design industry and using Illustrator.

Click on the logo to receive a free month of Skillshare with access to all the classes you could ever think about wanting to take!  The compulsive learner inside you will thank me.

Skillshare

10 DIY’s to Celebrate Summer

As I enter my last week of teaching before the summer break, I am itching to figure out how to spend my upcoming days aside from wedding plans.  I cannot wait to get started on these!

1. Wanderlust Globe: Record your summer travels (or dreamed of travels) with this Anthropologie-esque globe.

Via Pretty Little Details

2. Macrame Hanging Planters: Bring the outdoors in with this modern take on macrame hangers.

Via Garden Therapy
Via Garden Therapy

3. Outdoor Twister: Forget the plastic sheet that never stays put!  Bring the fun outdoors with this lawn DIY.

Via You + Me
Via You + Me

4. Build a Teepee: What better way to offer your kids (or yourself) a backyard getaway?

Via Cakies
Via Cakies

5. Movie Theater: Yes to relaxing summer nights with your friends at your own personal theater that shows what you want, when you want.

Via Giver's Log
Via Giver’s Log

5. Beach Hat Redo: Summer hat need an update?  Follow these instructions for a fresh new look.

Via Brit+Co
Via Brit+Co

6. Fabric Tile Coasters: Add to your outdoor dining with creative coasters in prints of your choice.

Via Style Me Pretty
Via Style Me Pretty

7. Fabric Hammock: DIY your own personal hammock that you never have to share with anyone!  Works equally well outside as well as in.

Via Make
Via Make

8. Cherry Blossom Jeans: Bring out your inner Blake Lively with this tutorial.

Via Brit + Co
Via Brit + Co

9. Giant Jenga: I cannot wait to make this for my outdoor wedding reception!  Fun is sure to be had by all.

Via A Beautiful Mess

10. Hurricane Lights: Jenga still to fun to stop after sunset?  Add a few of these around to help light your space.

Via nousDECOR
Via nousDECOR

Happy Making!

Stay in for V-Day Dessert with These DIY Ideas + Recipes: DIY Valentine’s Day Glassware

Glassware1I will begin this post by first stating that I love the Dollar Tree.  Everything in the store is actually one dollar.  It really bothers me when dollar stores charge more than that.  Its false advertising and must be stopped!

Anyway, I was looking around in the Dollar Tree and found a great set of sangria glasses.  Originally, I had a different idea for these glasses, but this DIY project came to me in a dream… No really… Well sort of.  It was one of those nights where I would wake up every so often because I couldn’t turn my brain off, and that night this idea came to me.

Here is how I created “You + Me” etched Valentine’s sangria glasses:

1.  I made my own stencils using Martha Stewart’s stencil making paper.  I used the flexible roll because it shapes around curved surfaces better.  Measuring the distance of the base of the glassware, I decided that my letters could only be 1/2″ tall at the most.  I like writing out my own letters, but this step could easily be accomplished with pre-made stencils.  I wrote and cut out the letters for “You + Me,” and stuck the letters to the base of the glass.  I added a little heart stencil to the other side because…well why not?

2.  I taped off the area of the glass that I did not want to etch and followed the instructions on my etching cream.  I used Martha’s etching cream, too.  Its a little pricey but the product turns out well.

3.  After washing off the etching cream, I peeled the stencils away and voila!  Etched glass.  It is super simple.  You can really be creative with your designs with that stuff.

4.  Lastly, I filled the glasses with my virgin sangria recipe, which I will share with you later!

Glassware Collage1